Showing posts with label spellbinders. Show all posts

Sunday, 25 January 2015

Graphic45 Christmas cards

I am disciplining myself to use my stash as much as possible rather than keep buying stuff, although I admit it 's hard to resist sometimes.  I had one sheet of this paper and made about eight cards with it, along with stuff from my stash.

The flowers were made using Heartfelt Creations poinsettia stamps and dies, stamped in white ep and coloured with distress inks.  The labels are die cut with Spellbinders and stamped with Kaisercraft Mistletoe stamp set and embossed to match. Matching ribbon and  Card Candy from Craftwork Cards finishes them nicely.


I was pleased to get so many cards out of the one sheet of 12 x 12.  
Thanks for looking, and any comments gratefully received.
Anne :)

Tuesday, 16 July 2013

Woodware Victorian Spray


This is a clear stamp by Woodware which I have done in several colours but just showing one version here today,  This is stamped in white ep, coloured with Copics and cut out.  The background part of the stamp is coloured with distress inks and has added white pen and glitter.  This is mounted onto a 6 x 6 card which has been pasted with Sparkle Medium through the Honeysuckle stencil (both by Imagination Crafts).  The sentiment is a Spellbinders label with a Superstamp (ancient) Happy Birthday coloured with distress ink and silver embossed.  I have glued some stamens just under the flower to give more dimension.    

Thanks for coming by and having a look and if you've left a comment, special thanks to you .
Anne :)


Thursday, 11 July 2013

Metallic markers background.


Hello bloggers, this card was a challenge to myself to use some printed card blanks which I had been given ages ago and put away in the deepest part of my stash.  I used a piece of card from my stash that was from a  long ago playing session using metallic markers on shiny card. Onto this piece I have stamped an old Hero Arts flourish flower stamp in black and then mounted onto gold miri spellbinders diecut.  The sentiment is a clear stamp set which I have lost the details for, sorry about that.

Thanks for coming by and special thanks if you've left a comment.
Anne :)

Monday, 8 July 2013

Crackle Paste cards


This is a large Dreamweaver stencil first pasted in matt black paste and when dry pasted with Crackle Paste.    
Once dry it is coloured with Brilliance inks through the stencil using a brushes.  It is very sheeny and is mounted onto miri card.  The background is Brilliance ink pads direct to paper, dried and put through the Spellbinders Garden Lattice folder.  This also has Treasure Silver wax gilt over the top.  The sentiment is from Art Stamps by Paula Pascual and is on a nestie circle. The middle die is part of a set which I cannot find the name of anywhere (sorry) this is coloured with Brilliance to match the background.  I have used the Spellbinders Stately Circle again on this one too.


The background for this one is the same folder as before and just has a few colours of Brilliance ink pad swiped over the top.  The peacock is yet another Dreamweaver stencil (no, surprisingly I don't have all of them!) done in the same way as the first card along with the sentiment.


This stencil is by Imagination Crafts and is plastic.  I have used the same technique for this one as in the 2 previous cards.  The die cut is a Sizzix cut to fit and the sentiment is Hero Arts which I have done in gold flakes.

Thanks for looking and any comments gratefully appreciated.

Anne :)

I am entering the Imagination Crafts stencilled card into their challenge. http://imagination-craftschallenges.blogspot.co.uk/2013/07/imagination-crafts-challenge-1-anything.html

Saturday, 6 July 2013

Baby Girl Cards

My lovely cousin has a new grandchild so I wanted to make a card for her and for her lovely daughter. First up is the Baby Buggy which is a Pink Petticoat digi here.


I used a pearlescent base and added some gorgeous digi papers from My Time Made Easy here. I also used  one from my Pink Petticoat stash.  The baby buggy is paper pieced from Pink Petticoat papers too. They are all edged with distress ink and the ovals are Spellbinders dies.  The buttons are from Fiona Jennings here which I have threaded with ultra thin ribbon from my stash.

The next one is a digi stamp from A Passion For Stamps here.  I have again used a pearlescent card base and  the My Time Made Easy papers and Spellbinders Timeless Rectangles. The image is coloured with Copics and the sentiment is using a fancy font on my pc.


I hope you like them and thanks for coming by and special thanks if you leave a comment. Anne :)

Thursday, 4 July 2013

Metallic dimension paste cards

I've made a ton of cards and haven't had time to blog any of them, until now.  So here are a bunch of them which include some Dreamweaver stencils plus crafters workshop plastic masks used with dimension paste.


This one is a Dreamweaver stenil and uses their metallic paste.  The sentiment (Elusive Images)  is done in gold flakes on a Spellbinders die cut.  The background is coloured with Brilliance inks and embossed and then rubbed over with Inka Gold.  The main piece is mounted onto gold miri card.  The strip down the side is coloured with Brilliance inks.

This is another Dreamweaver stencil and their metallic pastes mounted onto gold miri.  The two pieces of gold embossed card have the diecut white fence to hide the join.  The sentiment is gold embossed and on a Spellbinders diecut with bling pearls.


This is my favourite Dreamweaver stencil and done with their embossing paste.  Except I didn't have any copper so I coloured some white with copper paint and used this together with silver and gold paste.  The background is done again with Brilliance inks, then embossed.  The sentiment is from a Tim Holtz set and is done in gold flakes.  Both pieces mounted onto gold miri.


This is a TCW mask in the background done with gold paste and the birdcage is another Dreamweaver stencil done with the gold, silver and (my own) copper paste.  The bird (Inkadinkado) is done in gold flakes and the sentiment in gold embossing.


Similar to the above one but with gold flakes on the stamping (Kanban)  as the background and the flowers on the corner.

This one uses another plastic mask (TCW I think) and is pasted with the 3 colours of metallic pastes.  The sentiment is by Kaiserkraft and done in gold Brilliance ink on a Spellbinders die cut.  Fancy edging finishes it off.

Thanks for looking and any comments always welcome.

Anne :)

Thursday, 2 May 2013

Crafty Individuals Easel Card

I seem to always complain about the colour in my photographs not looking right and this is another one.  In real life the blue (chipped sapphire distress ink) and the yellow (wild honey distress ink) really pop out.


Anyway this card uses a Crafty Individuals stamp in black archival and clear embossed with the distress inks above.  The white mounts are Spellbinders Decorative Labels 8.  I used the Garden Lattice Embossabilities board for the piece behind the main image again using the above distress inks.  The darker blue piece is paper from my stash.  The corners are the waste from my fleur de lys punch.  The sentiment has gems on to bling it up a bit.  As I said it's a lot brighter in real life, excuses, excuses.

Thanks for coming by and if you left a comment thanks so much :)


Thursday, 25 April 2013

Shabby Chic Altered Jam Jar

I made this recently for a swap on Chic Swaps made from the Heart on Facebook.  I actually used a peanut butter jar as I liked the shape.


 This is not a great pic but I can't retake this shot as I have already sent the jar to the recipient.  Some of the other views are clearer and also there is a video here on my youTube channel.   I started by covering the glass jar with torn pieces of white mulberry paper using matt medium, and then adding torn pieces of a white handmade very fine Japanese paper which has gold and silver flecks again using matt medium.  When this was dry I applied the white rose fabric heart which  is the background for the main image and flowers etc.


I used a spellbinders matt and also cut out a matt using some gold fabric thread paper which was stuck onto paper so it could go through the grand caliber.  These are the next layer onto which the fairy/angel girl image is matted.  She is an image from Astrid's Artistic Efforts here.  I have used 2 pieces and some glue gel to give a bit of definition and she is covered with Glossy Accents. The believe is from a book of Tim Holtz word stickers.   The roses were next and they have been sprayed with Perfect Pearls mist and some have distress ink on them.


The leaves are plastic but look like frosted glass luckily.


The words around the jar are stamped in black archival onto Paper Artsy Crackly tissue paper and glued on using matt medium, and the gold birds are stamped and embossed in Gold EP onto the tissue paper and applied in the same way.  If you tear the paper you can hardly see the join.  The wings are stamped onto tissue as well and another card layer of wings is on top.  They are embossed in cosmic shimmer EP.  The gold lock and key were silver so I used a gold rub on cream to change them slightly.


There is a gold metal birdcage with flowers on the side and a pair of charms I made hanging on the pink and white ribbon.  I added 2 stickpins I made to match.


The lid was gessoed and painted pink using Paper Artsy Fresco Finish acrylic paint and a flower shape cut out from a lacy tablecloth is on top of that.  The braid was stuck on using my glue gun to keep it all secure.
More roses are sitting on the centre and a handmade lacy butterfly made using Fiona Jennings technique here  on youTube. 


Underneath the lid I stuck 2 pretty spellbinder circles and butterfly with a tiny bling gem in the middle.


It is fun to make something other than a card!  I hope you like it and any comments always very appreciated.
Anne :)

Wednesday, 17 April 2013

Wedding Cards.


This is a card I made for a friend recently. I did 3 cards using their choice of colours, being dark blue, grey and pale pink and this was the final choice.  I saw this shaped card on Pinterest and did my version of it.  I cut out rectangles and rounded the corners then used them as a template to  make the card shape.  I did one for the front and one for the back.  I used pearlescent card to cut into the required shapes and put through the Grand Caliber using the swirls embossing folder.  These were then glued on to the front of the card.  The pearl strings were then glued in place.  The flowers are punched out of pearlescent paper and paper which has been sprayed with cosmic shimmer sprays. Sticking on the flowers and pearls was great fun.  The leaves are a Sizziz die and the cherubs and hearts are punched.  These were all glued on as shown.  I scored a horizontal line across the top of the back piece about an inch or so from the top so it will stand up.

These 2 were the others.  This first one is using a Stamp Oasis rubber stamp with black Archival ink on pearlescent card, and with a pink copic for the lips.  This is mounted onto a heart doily.  The background embossed card is also a gorgeous quallity pearlescent card already embossed, the edges of which I have punched out this lacy border.   The sentiment is stamped onto a Spellbinders fancy rectangle die cut, and colour tinted with Spun Sugar Distress Ink.  I sewed a running stitch down the centre of the pink lace to gather and have used a gross-grain ribbon down the middle - I used my copic to colour it grey.  The blue hearts are shimmery but you can't see that here.  The card itself is a soft grey hammered finish card.


The pink is hard to see in this photo - its a wedding stamp set by Amuse Stamps.  The basic design for this was on Pinterest and I have adapted it slightly.  I used an 8 x 8 card blank and cut strips of card out of an A4 sheet that I stamped with the wedding set using Spun Sugar again.  The borders are die cuts using my Spellbinder border dies.  The blue was done using Chipped Sapphire Distress Ink direct to paper.  The ribbon was coloured as before using copics and the sentiment was an Elusive Images stamp.


This might have been better using the blue on the images and the pink on the ribbon or border.  Anyway, thanks for looking and comments always appreciated :)

Tuesday, 16 April 2013

Micro glitter cards

I did a workshop at The Craft Barn with Carole Cockburn ages ago and she shared the micro glitter technique with us. The first card is one I made on the workshop.  You basically stamp onto card, edge with distress ink, cut out both the card and a piece of double sided ultra sticky using a die; apply the sticky shape to your stamped piece, remove the carrier sheet and apply transparent micro glitter to the whole thing.  Then use this to make your card.  This one has an embossed piece behind the matt and a stamped and ink blended background bottom piece.  I always treat cards I make on workshops as prototypes or a basis for my own interpretation - or playing! as I prefer to call it :)


This is one of mine with Spellbinders die matts.  I promised myself this year I would use stuff from my stash more and I have had these papers for ages, so went ahead and used them on most of these cards.


Another one. Same techniques.


This one has upcycled ribbon from a gift. Like all crafters I save everything;  I really am trying to use my stash!


This one has an embossed background, not sure if you can see it on here. This one only has distress ink on the glittered piece and the rest is clean and simple.


This one has gems on top of the glitter, I wasn't sure if they would stick but they do.  This one uses on of my favourite Cheery Lynn dies and I have used distress ink to colour the card to match the piece.


Can't decide if I like this one so much.  Here it is anyway.  Martha Stewart punch on the edges.  Same techniques as before.


More upcycled ribbon with same techniques.  This one has no distress ink apart from the glittered piece.  Because the papers are matching they blend together.


Last one for now, same techniques as before and with distress ink - even with a small amount it does make a different look.


Congratulations if you are still here!  I always tend to make cards in batches playing with a technique so prefer to blog them together.  It takes me almost as long to make one card to make 6 as I agonise over every small detail with one card lol! Somehow making several cards at once frees me to try different things.

When I did the stamping for these, I stamped out a load more and used micro beads, and more using resist stamping which I will post when they are done.  I tend to do a ton of stamping one day, then another time take some of those and play with a technique or papers or backgrounds etc.  

When I am asked to make a particular card for someone often I am overwhelmed by choices!  Then I will usually make 2 or 3 different ones to choose from.  I much prefer to have a large stash of cards I have already made using different techniques or colour themes etc that I can select one from and add a sentiment if necessary.  How about you?

Thanks for coming by and any comments always very appreciated :)

Tuesday, 5 March 2013

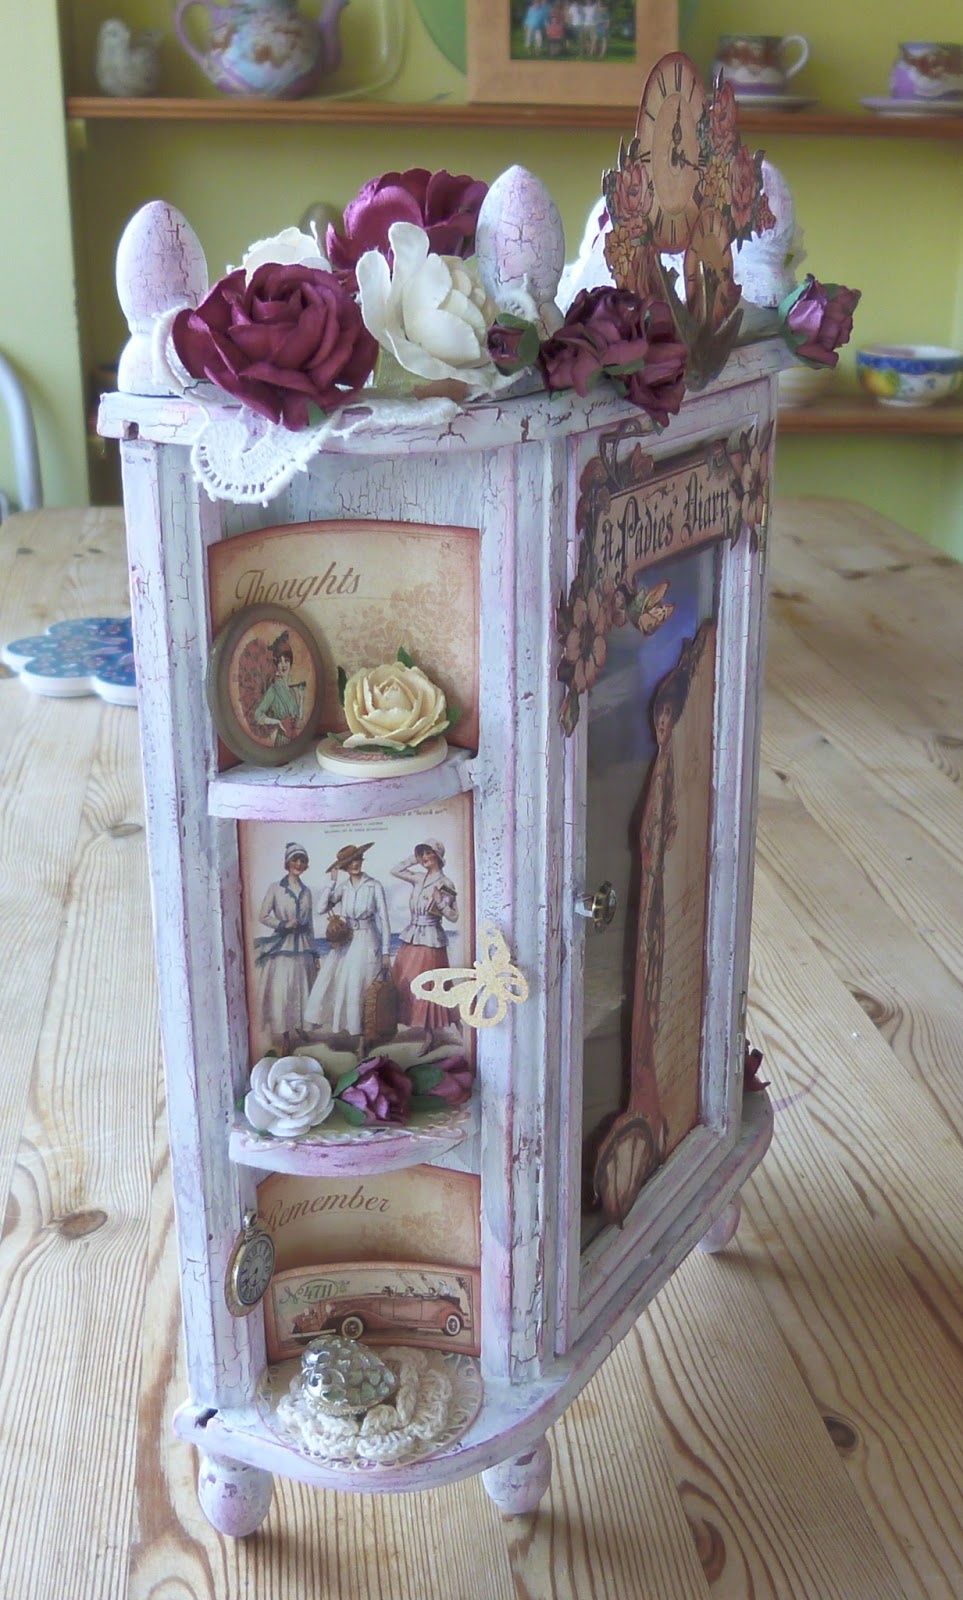
Ladies Diary mini cabinet

I found this treasure in a charity shop a few weeks ago, plain brown and very dusty, but at £4.50 an absolute bargain.  After wiping off the dust I took the door off and painted everything with gesso.  I wanted to have a background colour for the crackle that matched the papers so I mixed Paper Artsy Fresco Finish Snowflake and Claret to get a nice shade of light burgundy.  I used this for the next layer.  I then applied Paper Artsy Crackle Glaze and dried it with my heat gun carefully. Snowflake was the top layer and it is so great watching the cracks appear.  In a few places I wasn't happy with the result so I painted over all 3 layers to get a better look.  Fortunately, I had mixed plenty of the first colour to be able to do this.  You can speed it up by using the heat tool as long as you are careful and don't get too close.  When it was dry I used Distress Inks Victorian Velvet and Aged Mahogany on the edges.


 This is just with the crackle paint.
This is the top shelf inside.  Just has some flowers and  leaves along with the cut out.  I cut out all the pieces I thought I would use and edged them with the same Distress Inks as before.
This is the middle shelf and has a crochet doily and an old thread spool covered with a strip of the paper. Also the 2 cut outs.

The bottom shelf has another old thread spool with a strip of paper, a cut out and 2 crochet doilies with a metal heart charm.
Left side with 3 shelves as below.
Cut out at back, punched out lady on button, rose on 'spool top' (thanks to Cindy).
Another cut out, spellbinders fancy label, flowers and punched butterfly.
Two cut outs plus paper and crochet doilies, heart from old necklace, clock charm on punched background paper.

Right side as below.

Top shelf punched lady in frame charm, crochet doily, cut out behind, and butterfly.

Middle shelf has a little book I made out of the papers.  Pictures below.
I used Tim Holtz Tissue Tape to bind.
Bottom shelf has another cut out rose and butterfly.
Close up of top piece showing fussy cut clock and flowers, bird charm and more flowers.
Close up of top view showing flowers and lace cut from old tablecloth.

Close up of door showing fussy cut lady and banner.

I really enjoyed making this - especially as I am going to keep it!  Everything else I have made recently has been for swaps and although I really like doing swaps, it's nice to have something I have made.  Thanks for coming by and looking and any comments always very appreciated.

Anne :)