Wednesday, 20 March 2013

Masculine Cards


I always need men's cards and have made a few different, but similar ones here.  I used a French encyclopaedia that I bought at a boot fair when I visited my cousin in France last year.  The stamps are mostly from Katzelkraft apart from the text circles which are Crafty Individuals.


The papers were distressed with Vintage Photo Distress Ink and with my paper distresser.  The  pages are mounted onto embossed brown card using either the brick wall or tree bark pattern embossing folders.


Sorry about the glare here, it was a dismal day and I had to use the light.  All the images are stamped in black Archival and embossed in clear ink.


The bottle caps were crushed on my Big Kick embossing machine - which I discovered only after trying to bash them with a hammer (lol)  and made a big mess.  Anyway I stamped the circle travel text and the clock onto white card, punched them out and used Antique Linen and Vintage Photo Distress Inks to age them a bit.  After glueing them into the bottle caps I applied Glossy Accents all over and let them dry.


This one is done using two pieces from the book and I am sorry about the glare on the plane, it is black Archival.  These were so quick to do, apart from waiting for the Glossy Accents to dry.  They are not great works of art but sometimes you just need a quick card. Thanks for looking and any comments gratefully received.

Tuesday, 5 March 2013

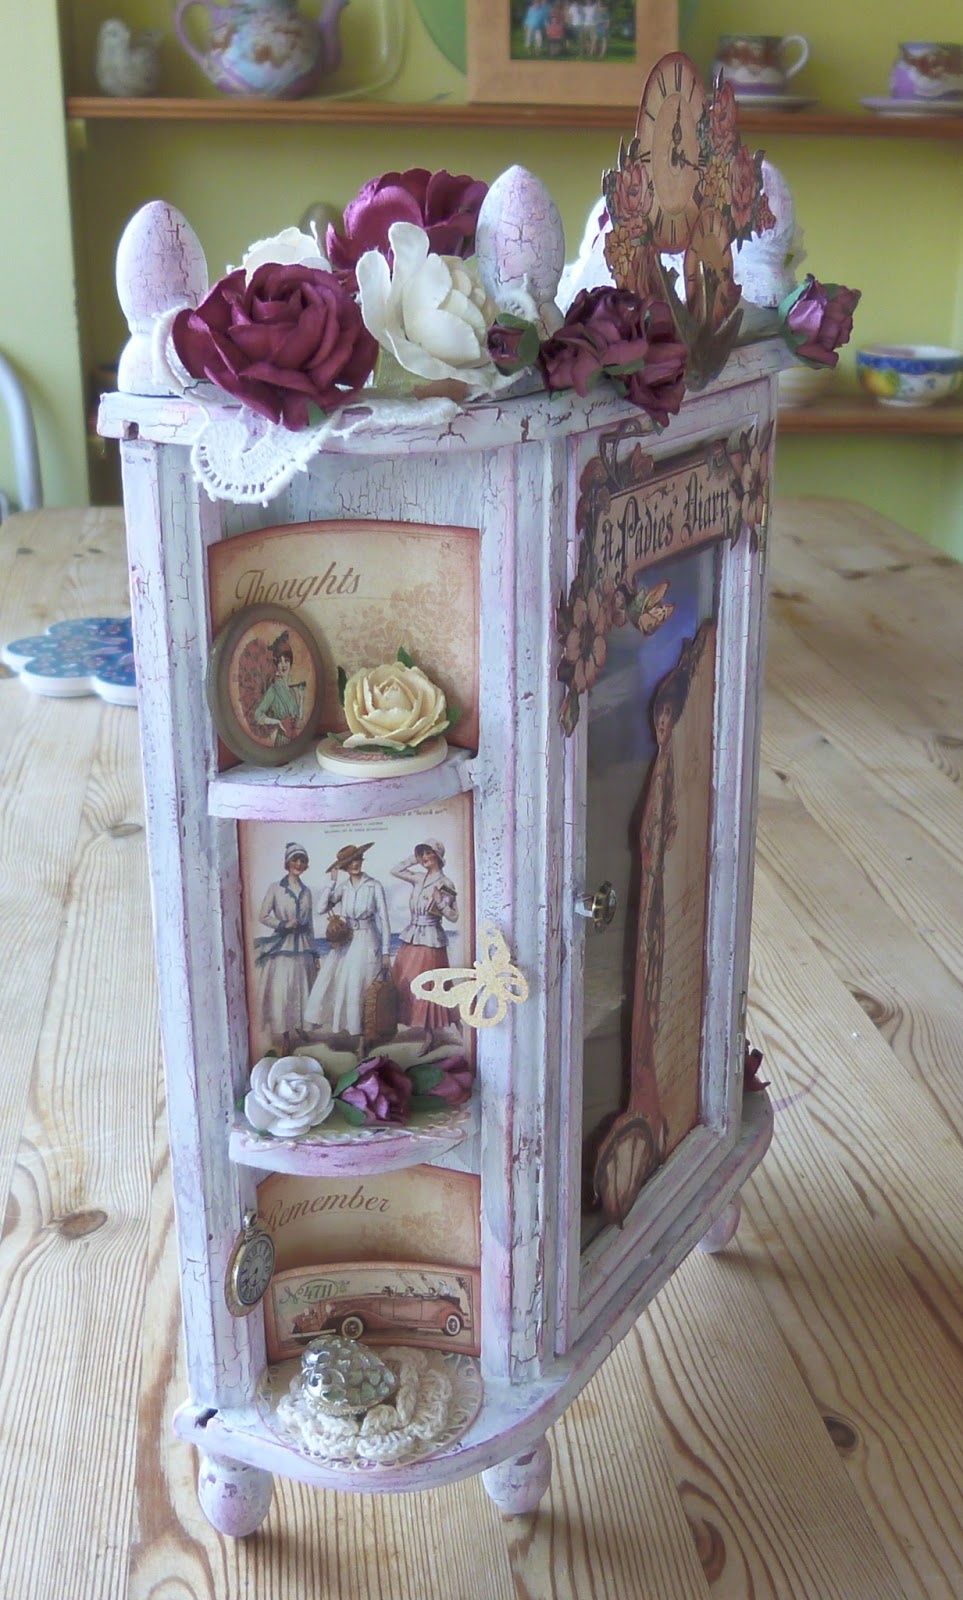
Ladies Diary mini cabinet

I found this treasure in a charity shop a few weeks ago, plain brown and very dusty, but at £4.50 an absolute bargain.  After wiping off the dust I took the door off and painted everything with gesso.  I wanted to have a background colour for the crackle that matched the papers so I mixed Paper Artsy Fresco Finish Snowflake and Claret to get a nice shade of light burgundy.  I used this for the next layer.  I then applied Paper Artsy Crackle Glaze and dried it with my heat gun carefully. Snowflake was the top layer and it is so great watching the cracks appear.  In a few places I wasn't happy with the result so I painted over all 3 layers to get a better look.  Fortunately, I had mixed plenty of the first colour to be able to do this.  You can speed it up by using the heat tool as long as you are careful and don't get too close.  When it was dry I used Distress Inks Victorian Velvet and Aged Mahogany on the edges.


 This is just with the crackle paint.
This is the top shelf inside.  Just has some flowers and  leaves along with the cut out.  I cut out all the pieces I thought I would use and edged them with the same Distress Inks as before.
This is the middle shelf and has a crochet doily and an old thread spool covered with a strip of the paper. Also the 2 cut outs.

The bottom shelf has another old thread spool with a strip of paper, a cut out and 2 crochet doilies with a metal heart charm.
Left side with 3 shelves as below.
Cut out at back, punched out lady on button, rose on 'spool top' (thanks to Cindy).
Another cut out, spellbinders fancy label, flowers and punched butterfly.
Two cut outs plus paper and crochet doilies, heart from old necklace, clock charm on punched background paper.

Right side as below.

Top shelf punched lady in frame charm, crochet doily, cut out behind, and butterfly.

Middle shelf has a little book I made out of the papers.  Pictures below.
I used Tim Holtz Tissue Tape to bind.
Bottom shelf has another cut out rose and butterfly.
Close up of top piece showing fussy cut clock and flowers, bird charm and more flowers.
Close up of top view showing flowers and lace cut from old tablecloth.

Close up of door showing fussy cut lady and banner.

I really enjoyed making this - especially as I am going to keep it!  Everything else I have made recently has been for swaps and although I really like doing swaps, it's nice to have something I have made.  Thanks for coming by and looking and any comments always very appreciated.

Anne :)


Wednesday, 20 February 2013

Monochrome Wedding

This card uses the lovely dies from Cheery Lynn as the mounts for the image.  I used the spellbinders m-bossabilities Garden Lattice folder on both sections of the easel leaving a narrow border.  The Cheery Lynn French Flair Doily stacker is cut in 2 sizes and mounted using dimensional dots.  The circle is from a Spellbinders Stately Circles die.  Onto this is stamped the bride and groom in black archival and embosssed in clear ep. The bride has a small bling stone glued onto her hand.. The bride and groom, cake, champagne glasses, and bells are from Amuse stamps.  They are all stamped in archival and clear embossed.

The On your Wedding Day and the hearts are from an Anita's stamp that I have cut up so I can use the words and hearts separately.  The sentiment is stamped onto another Spellbinders diecut Timeless Rectangle.   
I have added another matt for the sender to write their personal message.  This is (I think) from Go kreate.


In the event I did another version of this card using red accents which was preferred for a particular wedding that was Red & White themed.


  I do love the Cheery Lynn set of dies it is so pretty and you can use it as a frame or mount.  Anyway thanks for looking and any comments gratefully received.

Monday, 7 January 2013

Mixed media lady

This is a canvas I made at a workshop taught by Lina Mcdermott at her home recently.  I am relatively new to acrylics but really like the challenge of new media.  The background is gesso and acrylic paint with torn paper to give texture.  A bit of stamping and stencilling with paint and gesso, going over the edges and down the sides of the canvas completes the background.


The figure is drawn onto white card and stuck on using matt medium.  Her skirt is torn paper pieces and bodice is a book page.  Hair is done using smaller book print pieces and everything is adhered using matt medium.  Her skin is painted in acrylic and her face is drawn on using pencil.  A tiny paintbrush was used to finish painting her features.  The colour isn't so good in the photo as usual.


It's nice to have something a bit more permanent than a card, although I love making cards too.  I hope you like her and thanks for coming by, and of course, any comments very appreciated.

Anne :)

Saturday, 22 December 2012

Warmest Christmas Wishes

I love making Christmas cards after I don't actually need any more because then I can just enjoy the process with no pressure.  This card uses pretty Christmas papers I bought last year from Create and Craft and they were an amazing bargain price.  They are gorgeous colours and the set includes printed vellum and die cuts, plus they are still available in their sale.
I used a Craftwork Cards 6 x 6 blank and distressed the edges of the papers using my distressing tool from Making Memories, but you can just use scissors.  I added a piece of translucent vellum from my stash and sewed it on with my sewing machine using a zig zag stitch .  I also sewed the stripy strip using a straight stitch.


The image is a Pink Petticoat digi from last year coloured with pencils.  I used distress ink around the edge whilst it was still in the spellbinders die.  This is mounted onto a nestie scalloped circle in one of the background papers.  The snowflake is a Marianne die and the buttons were clear ones that I coloured to match using copics.  The ribbon is from a local haberdashers and is tied along with the buttons with crochet cotton.  I added some fluffy stuff on the main image to finish it off.

Thanks for coming by and any comments very welcome and appreciated :).

Friday, 21 December 2012

Stampendous Christmas postcard cards

This is my favourite stamp this Christmas and have used it loads in different ways.  One way is these cards below using distress ink to stamp the image and  frantage embossing around the edges (great fun!).  Dabbing  alcohol ink on shiny card backgrounds (even more fun!).  I used another new favourite Spellbinders die set to do the labels which I absolutely love.
I didn't have any red poinsettias so I used alcohol ink over an Imagination Crafts stencil/mask and cut them out, and used card candy as centres. I also used card candy on the labels.  Some of the largest snowflakes were die cuts from my stash, originally from Craftwork Cards a few years ago which are  no longer available unfortunately, the rest I cut from Marianne snowflake dies.
The sentiments are Hero Arts ancient wooden stamp set that I unmounted and a clear stamp set that I have since lost the packaging for and can't now say which ones they are.  I wish they would all put their names on the backing sheets.
 I am trying to get all my Christmas cards blogged before Christmas but as I am still having a great time making more, I'll probably end up posting in January lol!


Thanks for looking and I hope you have a wonderful Christmas.  Any comments very appreciated :)

Thursday, 20 December 2012

Christmas cards with Margaret Sherry digis.

Here are some cards I made recently using Margaret Sherry digi images.  I mounted the images onto mats or die cuts and used the waste from the die cuts as a frame for some too.  The backgrounds are from the same set and also some Pink Petticoat digis.  The sentiments are also from the same set and I used shaped Craftwork Cards card blanks. I used Glitter Magic and ribbon from my stash.   It certainly saves time using digis when you have a lots of cards to make.  My first love is stamping but I did have fun glittering and glazing these fab images.  On the snowballs I used fluffy stuff which puffs up when heated to resemble snow, it's great fun.


I hope you're still here!  Thanks for looking and any comments very welcome :)