Saturday 22 December 2012

Warmest Christmas Wishes

I love making Christmas cards after I don't actually need any more because then I can just enjoy the process with no pressure.  This card uses pretty Christmas papers I bought last year from Create and Craft and they were an amazing bargain price.  They are gorgeous colours and the set includes printed vellum and die cuts, plus they are still available in their sale.
I used a Craftwork Cards 6 x 6 blank and distressed the edges of the papers using my distressing tool from Making Memories, but you can just use scissors.  I added a piece of translucent vellum from my stash and sewed it on with my sewing machine using a zig zag stitch .  I also sewed the stripy strip using a straight stitch.


The image is a Pink Petticoat digi from last year coloured with pencils.  I used distress ink around the edge whilst it was still in the spellbinders die.  This is mounted onto a nestie scalloped circle in one of the background papers.  The snowflake is a Marianne die and the buttons were clear ones that I coloured to match using copics.  The ribbon is from a local haberdashers and is tied along with the buttons with crochet cotton.  I added some fluffy stuff on the main image to finish it off.

Thanks for coming by and any comments very welcome and appreciated :).

Friday 21 December 2012

Stampendous Christmas postcard cards

This is my favourite stamp this Christmas and have used it loads in different ways.  One way is these cards below using distress ink to stamp the image and  frantage embossing around the edges (great fun!).  Dabbing  alcohol ink on shiny card backgrounds (even more fun!).  I used another new favourite Spellbinders die set to do the labels which I absolutely love.
I didn't have any red poinsettias so I used alcohol ink over an Imagination Crafts stencil/mask and cut them out, and used card candy as centres. I also used card candy on the labels.  Some of the largest snowflakes were die cuts from my stash, originally from Craftwork Cards a few years ago which are  no longer available unfortunately, the rest I cut from Marianne snowflake dies.
The sentiments are Hero Arts ancient wooden stamp set that I unmounted and a clear stamp set that I have since lost the packaging for and can't now say which ones they are.  I wish they would all put their names on the backing sheets.
 I am trying to get all my Christmas cards blogged before Christmas but as I am still having a great time making more, I'll probably end up posting in January lol!


Thanks for looking and I hope you have a wonderful Christmas.  Any comments very appreciated :)

Thursday 20 December 2012

Christmas cards with Margaret Sherry digis.

Here are some cards I made recently using Margaret Sherry digi images.  I mounted the images onto mats or die cuts and used the waste from the die cuts as a frame for some too.  The backgrounds are from the same set and also some Pink Petticoat digis.  The sentiments are also from the same set and I used shaped Craftwork Cards card blanks. I used Glitter Magic and ribbon from my stash.   It certainly saves time using digis when you have a lots of cards to make.  My first love is stamping but I did have fun glittering and glazing these fab images.  On the snowballs I used fluffy stuff which puffs up when heated to resemble snow, it's great fun.


I hope you're still here!  Thanks for looking and any comments very welcome :)


Wednesday 19 December 2012

Secret Santa Stocking and a step by step on fabric flowers


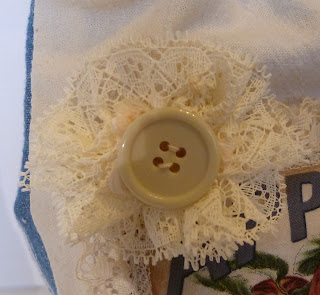
Hi bloggers, this is a stocking I made for a secret santa swap in a group I belong to.  You can't see the lace on the side views as it's covered with the flowers!  I didn't take any shots of the front view unfortunately.  The step by step below shows the method of making the flowers, which are virtually the same as the ones I made for the Shabby Chic Bags (previous post).  I have to thank Fiona Jennings (jennings644 on youtube) for the idea for the flowers as she made some organza (i think it was organza) ones using this technique and I have shamelessly copied it for these cotton and lace ones.


1.  Cut out circles of different fabrics, I drew round a mug on paper and used it as a pattern.  I made some slightly smaller.


2. Fold in half then half again,and half again, so you have a cone shape.  Trim the top edges so you have a rounded end.


 3. Open out and you should have a rough flower shape.


 4. Do some in different fabrics


 5. They don't have to be perfect!


6.  Fold in half and sew a running stitch in the middle of each one.


7.  This is to give an uneven look when they are opened out and sewn together.


 8.  I have used a doily centre for the final piece - you don't need to sew this one at this stage.


 9.  Open out and stack together in whatever combination pleases you.  There are about 4 layers in these ones.  It helps to pin them together.


10.  Sew through the middle using strong thread (or double ordinary thread) you only need 6 stitches or so and then finish with a button or bling.  You could use a glue gun if you prefer not to sew and if you don't plan to wash them in the future.

I hope you give this a try, thanks for looking, and any comments very appreciated :) 


Tuesday 4 December 2012

Shabby Chic Chambray Bags

I made these three bags as part of a swap and I must admit they took absolutely ages to make!  I think perhaps one would have been enough.  I am pleased with the way they turned out and would have like to have kept them!  However, that was not to be but I can always make more ( I always say that but  never do!).

The central motif on all 3 bags are fabric and  I used iron on adhesive backing to stick them to the cotton fabric.  I sewed lace trim around the edges of all 3 then cut the chambray pieces for the backs.  This material was a shirt which used to belong to my son (that he hardly ever wore) and I had kept it as I loved the softness and different patterns in the faded blue colour.  After sewing them into bags I made the casings for the drawstrings and then trimmed with more lace (this was the frilled edge of some lace curtains).


'Kitchen' front view


'Kitchen' back view


'Kitchen' charm, made out of an earring.


Lace flower on 'Kitchen'


'Kitchen' another front view showing buttons.


'Kitchen' chambray and lace flower.


'Kitchen'  lace trim flower with satin ribbon flower centre.


'Coffee' front view.


'Coffee' close up.


'Coffee' back view


'Coffee' flower close up


'Apples' front view


 'Apples' flower close up


'Apples' back view.


'Apples' charm close up.


I decided to  make some flowers out of chambray, broderie anglais, lace curtain and doilies.  I have a step by step tutorial which I will post separately.  After sewing the flowers on I added some buttons here and there.  I threaded the ribbon through and thought I was finished.  I had a quick look at the requirements of the swap and it said you had to have a charm so I made a charm for each bag.  I added the charms to the drawstrings because I thought it would be too much on the bag.  I had a lot of fun making the one with the beads and ended up buying a load of supplies to I can make some more!  Another hobby???  Cards, beads,  painting, sewing, altering, making flowers - no time left for housework obviously!

Thanks for looking and any comments very appreciated.

Anne :)